Advanced customization
This page is intended for advanced users that want to customize selenoprofiles behavior. Make sure you read ref:pipeline_detailed_ first.
Selenoprofiles was designed to be as customizable as possible. It offers to the user the possibility of writing python code which will be integrated and run. The code can be provided mainly through the configuration file of each profile, and through the main selenoprofiles configuration file. Additionally, custom modules can be loaded using option -add, as we will see later.
In the simplest use of custom code, the user can set profile specific procedures, exploiting the built-in methods for filtering:
### fam1.fa.config
blast_filtering = x.evalue < 1e-15
p2g_filtering = x.awsi_filter (awsi=0.3)
p2g_refiltering = x.coverage() > 0.5
With more experience, it is possible to add custom information to output, or even annotate motifs or secondary structures in the predictions:
### selenoprofiles config at ~/.selenoprofiles_config.txt
(...)
ACTION.pre_output.see_cys= print(x.output_id()+ " Cys:" +(','.join([str(i)  for i, aa in enumerate(x.protein()) if aa== "C"] or "None" ))
### output
fam1.1.homologue Cys:14,17,64,189,192
fam1.5.homologue Cys:18,21,194,19
fam1.11.pseudo Cys:60,63
fam1.19.pseudo Cys:None
The p2ghit class
To learn how to use custom code, you need to be familiar with some variables and classes in selenoprofiles, as these are the objects that your code will be manipulating. To do this, you should have already some experience with python code and classes. The p2ghit class is the key of user customization. It represents a prediction of selenoprofiles, coming from any source among blast, exonerate or genewise. It contains the alignment of a query against a target, and the genomic coordinates of such alignments. Let’s see its mostly used attributes and methods:
Attribute or method |
Description |
|---|---|
id |
The numeric id of the prediction (string). It is unique for that family and target |
chromosome |
The first word of the fasta header of the chromosome or scaffold where this prediction resides |
strand |
The strand of the prediction ( + or - ) |
label |
The label assigned to this prediction in the labeling phase |
filtered |
The filtered state assigned by the filtering phase (kept, filtered, refiltered, redundant). After inter-family overlaps are computed, the state overlapping is also possible |
: sup:output_id() |
The prediction name displayed in output (profile name.index id.label). Example: SelK.1.pseudo |
pred iction_program() |
The program that generated this prediction (blast, exonerate or genewise) |
q uery_full_name() |
The full name of the query, as it appears in the profile alignment |
coverage() |
A float value, indicating how much profile is spanned by the prediction (max is 1.0) |
protein() |
Protein sequence, with * for stop codons, U for Sec |
cds() |
Nucleotide coding sequence, as ATGC characters |
pos itions_summary() |
A string with the positions of all exons. Examples: 24-40,70-100 (+ strand) 400-450,340-354 (- strand) |
exons |
A list (array) containing the exons. Each exon is a list of 2 elements (integers), the position of start and the position of end of the coding sequence, both 1-based and included. Each prediction has at least one exon. |
header() |
A string used as default fasta header. Contains lots of non-sequence information. Example: SBP2.1.homologue chromosome:scaffold1 strand:+ positions:869-881,1163-1417 species:Polysphondylium_pallidum_PN500 target:genomes/P.pallidum/genome.fa prediction_program:exonerate |
dna() |
Full nucleotide gene sequence, including introns and frameshifts if present. |
splice_ site_sequences() |
A list of 4 letter strings, with the first two and last two nucleotides of each intron in the prediction. |
:sup:` subsequence(self, start, length)` |
Generic function to return any nucleotide subsequence of a prediction, using lazy computing. It can be used with negative start or large length to get the sequence around the genomic interval. Normally the indexes are relative to the predicted coding sequence, but you can use include_introns=True to count any nucleotide in the gene prediction. |
alignment |
Pairwise protein alignment between a profile query and the target, as an instance of the alignment class in MMlib (if interested, check its code in the installation directory). |
There are plenty more of methods. Many are actually inherited from the p2ghit parent class, called gene, defined in the library MMlib.py.
Custom output: option -fasta_add
The -fasta_add option represents an elegant and fast way to add information to output. A python written procedure with the same style of actions and filters must be provided as argument. The procedure is evaluated to a string which is inserted in the fasta headers of the files in output. All the fasta files in output will contain the add-on, as they all call the same function to determine the fasta header. Files with extension fasta, cds, dna, three_prime, five_prime and also ali will have it. Let’s see an example. Normally the fasta headers contain the following information:
>GPx.6.selenocysteine chromosome:chr3 strand:- positions:49395460-49395711,49394824-49395180 species:"Homo sapiens" target:/Genomes/Homo_sapiens/genome.fa prediction_program:genewise
Let’s say that you want to add the length of the protein to the header. You could add this to your command line:
-fasta_add '"seq_length:" +str( len(x.protein()) )'
Now if you run selenoprofiles with this (forcing the replacement of the old output with -O or specifying another output folder), you will have:
>GPx.6.selenocysteine chromosome:chr3 strand:- positions:49395460-49395711,49394824-49395180 species:"Homo sapiens" target:/Genomes/Homo_sapiens/genome.fa prediction_program:genewise seq_length:203
Actions
The actions are performed during the workflow on each prediction coming from the prediction choice/labelling step. Each action is provided as python code that is directly executed in the selenoprofiles environment. In a classical for loop, the variable x in the code is replaced by each p2ghit instance and executed. The keyword ACTION in the main configuration file denotes the active actions. Actions can be specified also in the command line. From now on, we will display the examples with the configuration file syntax:
ACTION.pre_filtering.echo = print( f'hello world {x.id} {x.label}' )
Separating the left side with dots, the first field is the keyword ACTION, the second field is the category of the action and the third is the name of the action. The category determines the time point of the actions, while the name is used only to order the actions in the same category. In this example, the user will just see something like this appearing in the output of selenoprofiles:
CHOOSE: choosing among available predictions, assigning label -->  selenoprofiles_results/Polysphondylium_pallidum_PN500.genome/prediction_choice/SelI.tab (just loading file)
SelI.1 : exonerate longest CDS predicted unaligned
SelI.3 : blast longest CDS predicted unaligned
SelI.4 : exonerate longest CDS predicted unaligned
SelI.7 : blast SecTGA aligned pseudo
hello world 1 unaligned
hello world 3 unaligned
hello world 4 unaligned
hello world 7 pseudo
...
Each action is performed on all available prediction at a certain step of the pipeline, determined by his category. There are many possible categories of actions: post_blast_filter, post_blast, post_blast_merge, pre_choose, pre_filtering, post_filtering, pre_output.
The categories names are pretty self-explanatory. The actions post_blast and post_blast_merge are performed on blast hits, while the others are performed on blast hits or exonerate/genewise predictions.
You will have to choose the category of your actions depending on what operation you want to perform. Actions executed during pre_filtering can be used to improve the predictions, but remember that their attribute .filtered is not set yet. post_filtering actions can access the .filtered attribute and are performed before storing results on the database. pre_output actions can add useful information to the log output.
Let’s see an example which uses an if statement to execute operations only on a certain subset of the available predictions. Typically, the attributes that you want to check are the .label and the .filtered attributes. Let’s say for example that we want to check the chromosomes and strands where the prediction with label “unaligned” rely:
ACTION.post_filtering.test = "if x.label=='unaligned': print( f'{x.output_id()} CHROMOSOME {x.chromosome} {x.strand} ') "
This adds something like this in the standard output of selenoprofiles:
...
SelI.1.unaligned CHROMOSOME gb|GL290990.1| +
SelI.3.unaligned CHROMOSOME gb|GL290997.1| +
SelI.4.unaligned CHROMOSOME gb|GL290984.1| -
...
The next action is for giving a quick look to the protein sequence of all discarded predictions. Below is the output added.
ACTION.post_filtering.check_ali = "if x.filtered != 'kept': print( f'{x.output_id()} {x.protein()} )'"
SelI.4.unaligned ITLVGLFCNIAMYLIVYFQCPGLTEPAPRWCYFLIAFLIFAYQTLDNLDGKQARRTKSSSPLGELFDHCCDA
SelI.7.pseudo VTATGFVCNFIALFLMSSYMRPVNDGQEPV
After the post_filtering actions are performed, the results are stored in the selenoprofiles database. Remember that if selenoprofiles finds the results in the database, it does not perform the steps up to filtering. Therefore beware that if you specify actions of category pre or post filtering (or any of the categories before them) on a second run of selenoprofiles, it won’t perform them unless you force the proper routine, for example with option -F to force the filtering routine. pre_output actions, on the contrary, are performed both if in the current run results are produced or loaded from the database, but only on the results which are output (determined by the -state option).
Later, we will see how actions can be used to correct gene structures, or to add custom genomic features to the predictions.
Blast filtering
There are 3 layers of filtering in selenoprofiles, all regulated by procedures defined in the profile. We have already seen them: blast filtering, p2g filtering and refiltering. The same grammar applies to all of them. For blast filtering, the most common attribute checked is the evalue, an attribute specific of blast hits. The blast hit is a subclass of p2ghit and has the same methods. Let’s see a simple blast filtering procedure as written in a profile configuration file; this accepts only the blast hits with evalue minor (better) than 1e-5:
blast_filtering = x.evalue < 1e-5
Selenoprofiles offers also more sophisticated tools, which map the prediction back to profile alignment to use what we know from the profile alignment. For example many families possess N-terminal regions of disordered or repetitive sequence, which hits spuriously many regions in the genome. The resulting blast hits span only the initial portion of the profile.
You may want to exclude those, using function is_contained_in_profile_range:
blast_filtering = x.evalue < 1e-5 and not x.is_contained_in_profile_range(1, 35)
The similar function spans_profile_range asks whether the predictions spans certain columns of the alignment, useful when you want only proteins with a certain conserved domain:
blast_filtering = x.evalue < 1e-5 and x.spans_profile_range(50, 60)
The function show_conservation_in_profile_range is useful when dealing with blast filtering of profiles with regions of low information. It checks the number of pairwise similarities (defined as positive scores in the BLOSUM62 matrix) between the amino acids in the query and in the target in the prediction along a certain profile range. In the example below, predictions are required to have 3 conserved amino acids in the region from positions 1 to 50:
blast_filtering = x.show_conservation_in_profile_range(1, 50, 3)
AWSI Z-score based filtering
We developed various method to score how much a sequence “fits” in a protein profile. We called the best performing one Average Weighted Sequence Identity (AWSI).
It is based on the Weighted Sequence Identity (WSI), a scoring method for comparison of two sequences, with one of the two belonging to a profile alignment.
The WSI score is computed as an average of sequence identities with different weights on the different columns of the profiles. In the pairwise comparison between the profile sequence and the candidate sequence, the weight is given by the representation of the amino acid in this profile sequence and column across all the profile. More conserved columns are given more weight thus more importance. This weight is also multiplied by the column coverage, that is to say, the total number of characters which are not gaps divided by the total number of profile sequences. In this way, the alignment regions present only in a small subset of sequences have less importance.
When the term AWSI is used in this manual, we refer to the variant AWSIc, computed as just explained. There is another variant (AWSIw), which is computed in the same way, but the weight is not multiplied by the column coverage.
When comparing a candidate sequence against a profile, a WSI for each profile sequence is calculated. Each one ranges from 0 to 1, as it is normalized to the sum of weights in that WSI. Now the AWSI of the candidate sequence is just the average of all computed WSI.
Although the range of AWSI is also between 0 and 1, the maximum value it can assume is constrained by the profile characteristics. In a profile with very dissimilar sequences, no candidate sequence can reach high scores (as if it matches a sequence of the profile, it cannot match the different ones at the same time). Thus, it is useful to adjust the AWSI threshold for each profile.
For this purpose, profile alignments are analyzed when used for the first time, and AWSI values for all sequences are computed. For each profile sequence, we compute its AWSI as explained above, considering this sequence as a candidate, and the rest of sequences as the profile to compare against.
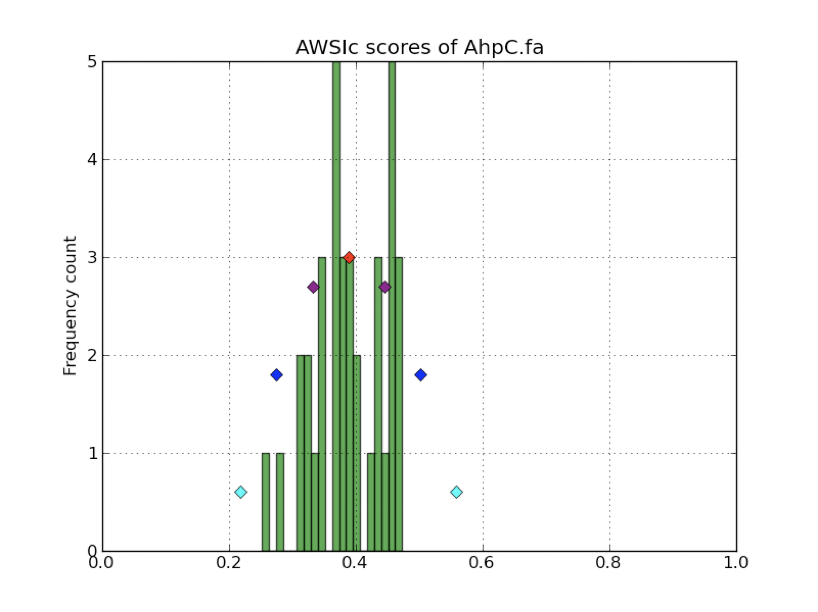
The distribution of these AWSI scores is used to decide the similarity threshold when fitting a sequence into this particular profile. The AWSI score of the target sequence is fit in a Gaussian distribution with the profile average and standard deviation, and a Z-score is computed. In the default p2g refiltering procedure (awsi_filter), the Z-score must be greater than -3.
The script selenoprofiles_build_profile.py can be used to display the distribution of the AWSI scores with option -d, as shown here above (pylab must be installed). The frequencies of the computed AWSI values are shown as green columns, while colored dots are used to display the approximated gaussian distribution: the red dot is the average, while the purple, blue and cyan dots correspond to the average minus 1, 2, 3 standard deviation respectively. The default cut-off point is thus indicated by the leftmost cyan dot.
The methods of the p2ghit class relevant to AWSI scores are:
awsi() with no arguments, it returns the AWSIc value for this candidate. Used as awsi(with_coverage=False), returns AWSIw instead
awsi_z_score() returns the z-score compute comparing the AWSI of this candidate with the profile distribution. This function also accepts the with_coverage=False switch to return AWSIw instead.
awsi_filter() returns True if the prediction would pass the default AWSI-based filtering, False otherwise. This function also accepts the with_coverage=False switch to return AWSIw instead. This is normally computed just as awsi_z_score()>-3, with two possible exceptions. For extremely conserved profiles, the cut-off threshold would be generally too strict. Thus, if the candidate has an extremely high AWSI (>0.9), it is accepted regardless of the profile characteristics. The second exception is for profiles with few sequences (<3). In these case, the computed AWSI standard deviation is always zero or extremely close to it, and this would also result in filtering too strict. Thus, for these profiles the filter just checks that awsi()>=0.3
One can alter the filter behavior using any of these arguments to the awsi_filter function: z_score, awsi, few_sequences_awsi. For example awsi_filter(awsi=0.5) accepts any candidate scoring a AWSI with the profile of 0.5 or greater (or a z_score >-3).
Other filtering functions
Here’s some other methods useful for blast or p2g filtering of specific families.
The function seq_in_profile_pos provides the amino acid predicted in the target at a certain position of the profile alignment (may be - for unaligned). It can be used to check that certain domains are complete (e.g. redox boxes CXXC).
p2g_refiltering = x.seq_in_profile_pos(31)=='C' and x.seq_in_profile_pos(34)=='C'
The function sequence_identity_with_profile computes a quantitative measure of how much the prediction fits in the profile: it computes the sequence identity of the prediction with every profile sequence, and average them. It is a simplification of the AWSI score. With no arguments, internal (but not terminal) gaps are counted as mismatches. The choice of the threshold in this case depends largely on the profile.
p2g_refiltering = x.label!='pseudo' and x.sequence_identity_with_profile()>=0.25
The more useful function sequence_identity_in_range is analogous the previous one, but computes the average sequence identity only on a certain range of the profile. Predictions not spanning this region are given 0.
p2g_refiltering = x.label!='pseudo' and x.sequence_identity_in_range(40, 80)>=0.35
For a full list of the methods of the p2ghit class, run selenoprofiles with -help full or inspect the script inside your installation directory.
Tag blast filtering
Tag blast is an implemented form of filtering. This consists in searching the protein sequence predicted in the target against a comprehensive protein database (by default, Uniref50 maintained by Uniprot). The output generally provides a good annotation of the protein in question. Note that your profile may match sequences in the genome that are real genes, but do not belong to your family and are hit because of their sequence similarity. These predictions usually have blast hits against proteins in Uniref50 which are not in your protein family. Tag blast utilizes a set of profile-defined tags to scan the titles in the blast output and assign a score to the prediction. A predicted sequence that resembles proteins not belonging to the family are likely to be spurious, and will be assigned a negative tag score. To use tag blast, you must first set the list of tags for your profile in its configuration file. Tags are strings which are interpreted as perl regular expressions. In the configuration file of the profile, the tags are written as a python list of strings:
tags = ['SecS ', '(Sec|selenocysteine|tRNA).\* selenium transferase']
Tags should be carefully designed in order to recognize all sequences of the profile and those with similar names. For each blast hit appearing in the blast file, the tags are tested and a score is assigned to the title. Its absolute value is the negative logarithm of the evalue: a blast hit with evalue 1e-5 gets 5 points. The final tag score assigned to prediction is the sum of all the titles. If the title matches any profile tag, its score will be positive. If it matches any neutral tag, its score will be zero. If a title does not match any profile or neutral tag, its score will be negative. The neutral tags are used to skip all the blast hits with uninformative titles and those based only on computational prediction. The neutral tags are defined in your main configuration file, with a decent default value. For filtering, we check whether the final tag score assigned to predictions is positive:
p2g_refiltering = x.label!='pseudo' and x.tag_score() > 0
If you want to use the tag score in a filter, we suggest you to inspect manually the results and check their tag score first. For example with this action (paste it in the main configuration file):
ACTION.post_filtering.check_score = print(f"Tag score of {x.output_id()} filtered: {x.filtered}:\n {x.tag_score(verbose=1)}")
The verbose mode will allow you to check the titles of all proteins present in the blast output and the score assigned to them. This will allow you to build and improve useful tags for your family.
When the method tag_score is run for the first time on a p2ghit, blastp is run against the database defined in the profile or in the main configuration file (under the keyword tag_db). The output file is kept in the tag_blast subfolder inside the folder dedicated to this target. A tag blast run takes a few minutes, so take care of avoid doing it on a lot of hits. If you put the tag_score evaluation on the right side of an and construct, the tag blast will not be performed unless all conditions to his left are true:
p2g_refiltering = x.coverage()>0.4 and x.label!='pseudo' and x.tag_score()>0
GO score filtering
Similarly to the tag score, the GO score utilizes the same blast search against Uniref50, but in this case it is the GO terms associated to the proteins found which are evaluated. A list of the positive GO terms is to be provided in the profile configuration file:
go_terms = ["GO:08028", "GO:08030"]
A score is assigned to each blast hit depending on the evalue, as in the tag score. The GO terms are searched considering their hierarchy: if for a certain title in the blast output, a GO term is found which is a child of a GO term defined in the profile configuration, this will count as positive. Blast hit with no annotated GO are scored neutral. Only molecular functions GO terms are checked.
p2g_refiltering = x.label!='pseudo' and x.go_score()>0
Integrate your own code: option -add
With the -add option, you can provide a python add-on file that will be loaded in selenoprofiles. This will allow you to define functions can then be used in any procedure, for example for filtering or output. The code inside the file provided is read line by line and executed in selenoprofiles when all variables are already loaded and everything is ready to run.
User defined functions are useful for filtering, labeling or outputing. Let’s see how to create a simple output function. Create a file called extension.py where you define function which accept a p2ghit:
def my_name_is(z):
  """This functions accepts a p2ghit and returns its output id """
  return z.output_id()
If you now you provide this file with the option -add, the function my_name_is will be available in selenoprofiles. Running selenoprofiles with:
-add extension.py -ACTION.pre_output.test "print(my_name_is(x))"
you will have something like this in the output:
...
SelI.1.unaligned
SelI.3.unaligned
SelI.4.unaligned
...
Let’s see a more relevant example. Assume that for some reason you are interested only in the non-pseudo, single-exon predictions. You could then write this function in your extension.py:
def has_no_introns(z):
  """ This functions accepts a p2ghit and returns True if it has no introns"""
  return len(z.exons)==1
You may then use this function for filtering, adding something like this in your profile .config file:
p2g_refiltering = x.label!= "pseudo" and has_no_introns(x)
Adding functions may be useful for several purposes. It is possible to write procedures to improve the predictions, as those previously presented, or for filtering, as shown above. It can also be used to perform one-time operations (for example to load custom data), or override some functions or attributes used in selenoprofiles. For example, the user may want to customize the labeling procedure used in selenoprofiles. The easiest way to do this is writing a new labeling procedure in the extension.py file, which redefines the .label attribute of the input p2ghit, and use it in a pre_filtering action. In this example, we define a procedure to label the predictions as short or long, checking their predicted protein length:
def custom_labelling(z):
  if len(z.protein()) >= 50:
    z.label='long'
  else:
    z.label='short'
We activate this by adding this action in the main configuration file:
ACTION.pre_filtering.labelling = custom_labelling(x)
Note that when the new function is called, the standard labeling procedure has been already called, so a .label attribute is available, and you can check it (or use it) to define the new label. Example:
def custom_labelling(z):
  original_label=z.label
  if len(z.protein()) >= 50:
    z.label='long_'+original_label
  else:
    z.label='short_'+original_label
The label is then typically used for filtering:
p2g_refiltering = x.label.startswith("long")
There are a few global functions in selenoprofiles that user may be interested in altering. In various steps of the workflow, the program must decide which gene structure prediction is best among 2 or more candidates. The first such function is named choose_prediction. This is used in the prediction choice step, when a single prediction among blast, exonerate and genewise is chosen. It accepts a list of p2ghit, with variable length (1-3). It returns a tuple like (p, s) where p is the chosen p2ghit and s is a string with a reason why (it will be printed and stored in a file). The native function is the quite complex, and takes into account the presence of frameshifts, presence of stop codons, aligned Sec position (for selenoprotein families), length of coding sequence (you can inspect the code at def choose_prediction in selenoprofiles.py). Let’s see an example in which this function is replaced by a simple hierarchal function, choosing predictions by genewise over those by exonerate, over those by blast (note that it is still possible that even blast is chosen in this way, if for a given hit the exonerate and genewise predictions are empty or non-valid). Put this into your extension.py file provided to option -add:
global choose_prediction
def choose_prediction(candidates):
  for c in candidates:
    if c.prediction_program()=='genewise':
      return (c, 'genewise is available')

  for c in candidates:
    if c.prediction_program()=='exonerate':
      return (c, 'exonerate is 2nd best')

  return (candidates[0], 'only blast available')
When writing a new choose_prediction function, you may still want to call internally the old function, which you can refer to as choose_prediction_selenoprofiles. In this example, the new function keeps the behavior of the old one, except for blast predictions which are forced to be never chosen. This is accomplished by returning an empty_p2g() object when only blast is available:
global choose_prediction
def choose_prediction(candidates):
  if all( [ c.prediction_program()=='blast' for c in candidates ] ):
    return empty_p2g(), 'excluding blast'
  else:
    return choose_prediction_selenoprofiles(candidates)
The second such function is named choose_among_overlapping_p2gs_intrafamily and is used when removing intrafamily redundancy. This accepts two p2ghit that were found overlapping and returns the best one, which is kept. The default function calls internally choose_prediction. In its code, this is named choose_prediction_selenoprofiles, so if you override the choose_prediction, the choose_among_overlapping_p2gs_intrafamily function will still run the original, built-in procedure.
If you want to remove intrafamily redundancy using an overridden choose_prediction function, it is necessary to override choose_among_overlapping_p2gs_intrafamily too. You can search its code in selenoprofiles_3.py as a template.
The third and last function is named choose_among_overlapping_p2gs_interfamily and is used when removing redundancy between gene predictions by various profiles. This also accepts two p2ghit and returns one. The default function considers the AWSI score of the candidate with the 2 profiles, and their filtered attribute (a prediction kept by a profile is never masked by an overlapping prediction filtered by another profile). Let’s see how to replace it with a function which always keeps the prediction with longer protein sequence. Create an extension.py file like this:
global choose_among_overlapping_p2gs_rem_red
def choose_among_overlapping_p2gs_rem_red(p2g_hit_A, p2g_hit_B):
  if len(p2g_hit_A.protein()) > len(p2g_hit_B.protein()):
    return p2g_hit_A
  elif len(p2g_hit_A.protein()) < len(p2g_hit_B.protein()):
    return p2g_hit_B
  else:
    return p2g_hit_A
If you believe that your own function may be useful to other users, or if you need help building your own function, contact us.
Custom prediction features
Selenoprofiles offers the possibility to annotate and manipulate custom features linked to gene predictions. Such annotations (p2g_features) can be used for example for protein motifs or domains, or signal sequences, or secondary structures, present in all or some gene predictions. Within selenoprofiles, SECIS elements are implemented as p2g_features. Technically, p2g_feature is a python class, thought to be generic so the user can created a child-class (subclass) to adapt it to his specific purpose.
Selenoprofiles includes a built-in example to show the capabilities of p2g_features: the class protein_motif. This is thought to annotate a short motif within the protein sequence, the redox box, expressed as the perl-like regular expression C..C (C stands for cysteine, and . means any character). The class protein_motif allows to detect these motifs and easily integrate them in the p2g or gff output.
For any custom p2g_feature, the user has to define at least the following procedures: how to search and assign these features, how to dump them in the sqlite database, how to load them back. Then, optionally one can define how to output them to the gff and/or p2g file, and also how to reload the features if gene structure predictions are modified. The protein_motif includes examples of all these procedures.
All the code relevant to the protein_motif is here below, copied from selenoprofiles_3.py.
def annotate_protein_motif(p, silent=False):
  """p is a p2ghit. This is an example of method to annotate the p2g_feature protein_motif. To use, add this to the main configuration file:
  ACTION.post_filtering.annotate_motif =    "if x.filtered == 'kept':  annotate_protein_motif(x)"
  """
  s= protein_motif.motif.search(  p.protein() )   ##using search method of re.RegexObject  --  protein_motif.motif is such an object
  while s:
    protein_motif_instance=         protein_motif()
    protein_motif_instance.start=   s.start()+1   #making 1 based
    protein_motif_instance.end=     s.end()       #making 1 based and included, so it'd be +1-1
    protein_motif_instance.sequence=     \\
                  p.protein() [ protein_motif_instance.start-1 : protein_motif_instance.end ]
    p.features.append(protein_motif_instance)     ## adding feature to p2g object
    if not silent:  printerr('annotate_protein_motif found a motif: ‘ \\
                               +protein_motif_instance.output()+' in prediction: '+p.output_id(), 1)
    s=protein_motif.motif.search(  p.protein(), pos= s.start()+1 ) ## searching again, starting from just right of the previously found position


class protein_motif(p2g_feature):
  """ protein motif is an example of a p2g_feature, to annotate the positions of a certain motif defined as a perl-style regexp.  The motif is defined in the line following this, as a class attribute. In the example, the redox box (CXXC) is the motif.
      Attributes:
      - start      start of the protein motif in the protein sequence (1-based, included)
      - end        end of protein motif in the protein sequence (1-based, included)
      - sequence   motif sequence
  """
  motif=re.compile( 'C..C' )
  included_in_output=True
  included_in_gff=   True

  def dump_text(self):
    """ Returns a string with all the information for this feature. This string is stored in the sqlite database. """
    return str(self.start)+':'+str(self.end)+':'+self.sequence

  def load_dumped_text(self, txt):
    """ Reverse the dump_text method: gets a string as input, and loads the self object with the information found in that string. """
    start, end, sequence= txt.split(':')
    self.start= int(start);    self.end=int(end);    self.sequence=sequence

  def output(self):
    """ Returns a string. This will be added to the p2g output of the prediction to which this            feature is linked -- if class attribute included_in_output is True"""
    return 'Motif: '+self.sequence+' Start: '+str(self.start)+' End: '+str(self.end)

  def gff(self, **keyargs):
    """This must return a gff-like tab-separated string. In this case, we are exploiting and overriding the gff method of the gene class, which is a parent class for p2g_feature"""
    ## getting a gene object with the genomic coordinates of the protein motif. we use the gene method subseq, which returns a subsequence of the parent gene. Indexes are adjusted for protein-nucleotide conversion
    motif_gene_object= self.parent.subseq( start_subseq= (self.start-1)*3 +1,    \\
                                           length_subseq=(self.end-self.start+1)*3, minimal=True )
    #now motif_gene_object has a .exons attributes with the genomic coordinates of the protein motif. now we can use the native gff method of the obtained gene object
    return gene.gff(motif_gene_object,    **keyargs)

  def reset(self):
    """ This method is called when the linked prediction is modified, to allow to recompute some or all attributes of the feature. In this case, we are removing all features of this class, and annotating them again with the same method used to add them in first place: annotate_protein_motif"""
    ##removing instances of this class
    for index_to_remove in \\
     [i  for i, f in enumerate(self.parent.features) if f.__class__ == protein_motif ]  [::-1]: \\
        self.parent.features.pop(index_to_remove)
    #reannotating
    annotate_protein_motif( self.parent, silent=True )
The code above contains the definition of a class (protein_motif, including 5 methods), and the function annotate_protein_motif. This function takes as input a p2ghit instance, analyzes it, and if any protein motif is found, it populates its .features attribute with one protein_motif instance for each motif found.
If this function is never run, the protein_motif class is unused. As mentioned within the code, to activate it you should add this line to the main configuration file:
ACTION.post_filtering.annotate_motif = if x.filtered == 'kept': annotate_protein_motif(x)
In this way, the annotate_protein_motif will be run on every prediction that passed filtering. The protein motif C..C is defined as the class attribute motif, which is of type RegexObject from the pattern matching module re. Inside the annotate_protein_motif function, it is searched in the predicted protein sequence its dedicated method search. For each motif found, a protein_motif instance is created, and the start and end positions of the match are stored within this object; the protein sequence of the motif is also derived and stored.
Once the protein_motif instance is ready, it is appended to the .features list attribute of the input p2ghit. Shortly after, this p2ghit reaches the database step, and its information is stored as a sqlite entry. All the features associated to it are also stored in the database. For this reason, the method dump_text is called on every feature instance. This method must return a string containing all the information sufficient to then load it back. The method load_dumped_text is its reverse, and is used during the output phase to load the dumped information from the database into an empty protein_motif instance. An annotating function (in this case annotation_protein_motif), and the p2g_feature class methods dump_text and load_dumped_text are the minimal set of definitions to make a functional feature.
Other attributes and methods can be used to output the features. To output features to the native selenoprofiles format (.p2g), the class attribute included_in_output must be True, and the output method has to be defined. Features can be used for gff output too, if the class attribute included_in_gff is set to True. In this case, it makes sense to take advantage of the gene class, the parent of both classes p2ghit and p2g_feature.
The gene object is designed to represent a genomic interval, optionally composed by multiple exons, on a certain chromosome (or scaffold) of a target file. It provides plenty of methods such as for fasta fetching, cutting subsequences, computing overlaps, merging gene structures and so on. Its native gff method returns one line for each exon in the object, reporting its coordinates and optionally other attributes.
In the example above, the protein_motif class is not really used as a gene object, but just as a data container for the attributes start, end, sequence: its attributes chromosome, strand, exons are not used. Instead, the correct genomic coordinates of the protein motif are derived dynamically, and added to output by overriding the native gff method of the class gene.
For each motif instance, its start and end positions relative to the full protein sequence are available. Thus, the gene method subseq is used to derive the global genomic coordinates of the motif. This function accepts as input a gene (self) object, a start position and a region length, and returns another gene object, which contains a subset of the genomic intervals in the self object. If the desired region spans any exon boundary, the returned object contains multiple exons. In the code, the indexes are adjusted for converting protein-based to nucleotide-based positions. Once the appropriate gene object containing the global genomic coordinates for the motif is ready (motif_gene_object), the native gene class gff method can be called.
Lastly, the method reset can be defined for custom features that have to be recomputed when the predictions are modified, by actions such as those explained in Improving predictions in the Pipe. In the example, the protein_motif instances are searched and expelled from the features list of the p2ghit object for which the reset function is run. Then, the annotating function annotate_protein_motif is run again.